Ultra Awesome: May 2008

Tuesday, May 13, 2008

Ideas time!

Oh no! The evil Space Invaders have descended upon earth and they're demanding ideas for their....um....idea powered space ship!

Alright, so with the sudden overwhelming positive reception of my NES controller coffee table, I feel the need to outdo it (1UP it, even).
So I thought I'd ask the people of the internet for possible good ideas for future video game related furniture/artwork/creative things that I could try bring to life, and create more step-by-step/how-to style posts.

At the moment I'm thinking of making some sort of space invaders belt buckle using some of those wooden counting block things from primary school;
Perhaps paint them white or green and glue them together (using wire to connect the diagonal ones), and attach a belt clip to the back.

I've also been thinking that I need a better shelving solution for my video game consoles, I've now got 35 consoles at the moment, seriously, look;

bah ha! The Xbox takes up one whole shelf by itself!
And this photo was taken before I got my Famicom, Vectrex and ZX Spectrum.

I'm thinking I want some kind of modular shelving system where the shelves are made of individual boxes that stack on top of each other (like those Tetris shelves by Brave Space Design), and each shelf cavity has it's own power and AV plug, which all run back to a single output plug to the power point/TV.
That way, each console can have it's cords wrapped up next to it and still be plugged in, rather than having to run all the cords out to a power board where they're all tangled and shit.

So yeah, If anyone else has some nice ideas that they'd like to see possibly made, and explained how it was made, post it in the comments to here, and we'll all try to decide which one is the most ultra-awesome idea!

Tuesday, May 6, 2008

NES coffee table FINAL POST!! RAH!!!!

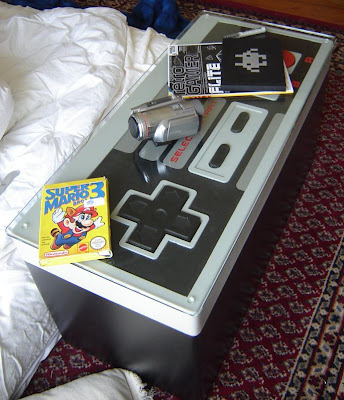
I've finally finished my giant NES controller/ coffee table/ storage box! Awesome!
The piece of glass that I had ordered arrived today, it looks super fresh.
Here are the photos of the final thing, with the glass on top:

You can see I got some tall clear rubber stoppers, which I stuck on the glass, so it doesn't damage the controller when it's sitting on top, and so it clears the height of the buttons:

And again, here are the pictures of what it looks like finished, without the glass.

And also again, here's how it opens up, to reveal the storage space inside, which I have already filled.

Look at the fun-vibes just radiating from Emily's face!:


Some people have asked for the blueprints I used to make it, so they can have a go at making one themselves (yay! I have inspired!).
I didn't really use "blueprints" for this, I basically just stuck my NES controller in a scanner and scanned it. I then printed it off so it filled an A4 page, and used that image to measure how far apart everything on the controller is.
The second half of these blueprints where are just a list of the pieces I needed to cut so I didn't forget.

One thing to remember if you try this, write a list of all possible tools that you might need.
The hardest tool to find for me was a 90mm Hole saw that I needed to cut the A and B buttons.
Take note that I have literally zero woodwork experience (my school never even had woodwork classes), besides the asteroids cabinet I made. However I did get a lot of advice from my dad and uncle about how I should do stuff (ie. like chiselling out the surface so the hinges sit flush etc.)


If you've just arrived at this post, here are all the previous posts I have posted with all the progress shots as I was making it:

NES coffee table
NES coffee table update 1: Bevelling the edges.
NES coffee table update 2: Making the buttons.
NES coffee table update 3: Making the D-pad.
NES coffee table update 4: Mounting the buttons.
NES coffee table update 5: Painting.
NES coffee table update 6: Wiring and final construction.

Here it is in action! zomg!:

Friday, May 2, 2008

NES coffee table update 6: wiring and final construction

While I was giving the coffee table its final paint job, I managed to get my hands on a spare NES controller PCB from a friend (The rubber contacts for the controller it was from were knackered, so I didn't ruin a perfectly good NES controller)

So I got some more coloured wires from Dick Smith and soldered them on to the NES PCB.
This is pretty easy because all of the button contacts ran back to a solder point on the board.

I soldered the other end of the wires to a female 9-pin plug I also got from Dick Smith, so that I could plug it in and unplug it from the wiring on the coffee table.

Meanwhile, I had to put the hinges on the lid and bottom part of the table so it could open and close.
I Had to chisel out the area where the hinges sat, so that they didn't protrude from the surface, creating a gap between the lid and the base.
I also needed to glue screw another piece of wood to the edge that the hinges would sit on, to thicken it up (the 18mm MDF wasn't thick enough to screw the hinges into).

Here is what the hinges looked like once they were screwed in. The pin also comes out, so I can take the lid off whenever I want, like if I needed to repair it or something.

Here is all the wiring for the buttons from the back. The wires there lead into the male side of the 9-pin plug.
Here is how I made the button contacts. The big piece of the underside of the button is a piece of copper, which is connected to the ground wire.
I used a piece of brass for the other side of the contact because it is more springy than copper, thus it won't just bend flat if the button is pressed all the way down.

And here are the final pictures of how the coffee table looks, all finished and awesome-like!
Well it's not quite finished yet; my sister stole the piece of glass that I had designed this for (which sits on top, so you can use it as a table), so I had to order a new one from mitre10 (130 fookin' bucks! That's more than this whole thing cost to make!).


May awesomely daggy 60s styled futon.

Here you can see I have already filled it with crap. It's good though, my room is now a whole lot cleaner.
p.s. that's not my n-gage, is swear...... it's my spare one...

And here's a picture of my girlfriend having enormous amounts of retarded-looking fun playing Super Mario bros. 3;


Okay, I got one more post for the coffee table, even though it's finished.
I'll post a picture of what it looks like with the piece of glass on, and I'll post a video of us having
mega-awesome fun playing it together (and me kind of cracking the shits at Emily for not jumping at the right time.)
And I think I'll also post links to all of the NES coffee table posts, so it's easier to view the progress.