Ultra Awesome: 2008

Friday, October 31, 2008

A Short Visual History of Videogames

Hallo people! Sorry I haven't posted in ages, I've been busting my balls on my final year uni assignment, and doing some freelance work.

I've also been trying to get together a visual effects folio website, which I have just finished uploading, and you can totally check it out here:
www.ultra-awesome.com

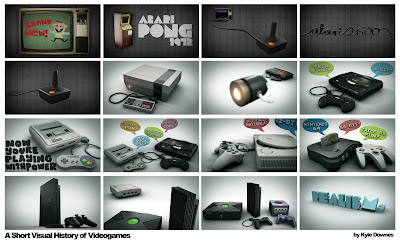
Anyway, about my uni piece; It is an entirely animated 3D piece called "A Short Visual History of Videogames".
It is a 3 minute long "visual essay" (or whatever you call these things) about the history of videogame consoles, from 1972 when Ralph Baer invented the Odyssey with Bob Tremblay, to the launch of the current generation of consoles and beyond.

I did my project about the history of videogames because; I know lots about it, and I'm not very good at the deep-meaningful/pretentious stuff that most student films/animations seem to consist of. Plus ultimately my piece was always mainly intended to be a sort of modelling showreel, with the narrative taking a back seat to pretty visuals designed to show off my technical abilities with 3D modelling and lighting etc.

My aim here was to develop my modelling/texturing/lighting/compositing skills to the point where I was able to achieve photo realistic visuals with all of the consoles.

Anyway, you can view the finished piece here, or you can go to this page on my folio site:
A Short Visual History of Videogames
To view it in a larger size (since blogger makes the video really small and low resolution here, lame).


If you want to see this full sized 1024 by 576 resolution video, click on the the vimeo button in the video player, scroll down and click "download original file" (although, you'll need to create a vimeo account to do that).

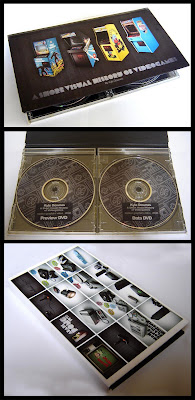
I'd also made a snazzy looking DVD case for when I handed in all of the submission stuff to the lecturers:Here is a super hires image with random screenshots, that I used for the back cover of the DVD case.

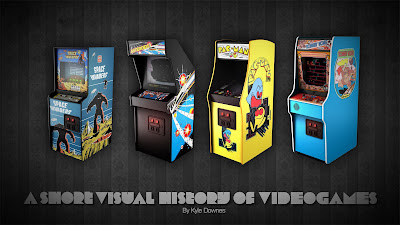
Also, here is the front cover of the dvd case I made, in a handy desktop wallpaper size, for if you want a bit of old school arcade action on your computer desktop:


Here are a couple of screencaps of the Maya scene files, to give you a bit of an idea about my mesh topology and the lighting setup I used:

Lighting was pretty simple for most scenes; only 3 directional lights with soft shadows, to simulate studio lighting and to provide soft reflections on the consoles made of the black low-sheen plastics (I used an anisotropic shader for this with a volumetric brownian bump map).

Some scenes had more complex lighting; for the xbox/PS2/gamecube/dreamcast scene, I had to use a heap of light-linked area lights to get specific reflections off certain objects for the desired camera angle.

Thursday, August 14, 2008

Ego boosting news paper scans!

To anyone actually following this blog; sorry about the very slow rate at which I post here.
I figure it is better to do less posts, with lots of substance, than more posts that are just pointless and completely uninteresting.

Also, I've been working like 15 hours a day on my final semester uni project, which is sending me slightly mental, so I haven't had time to try anything else constructive (I'll make sure to post some updates on how that is going a bit further down the track).

Anyway, since a couple of friends have been asking to see them, I thought I'd better scan-in-and-upload a few of me super famous news paper appearances of the last few weeks.

So here you go:

This was the first one to be published, the guys from the Extra:Tech section of the Herald sun decided to do a short write up for the July 16th news paper:


Soon after that, The Australian called me to ask a few questions, they also sent out a photographer to get some snaps, this article was published on the front page of the Higher Education section in the 23rd of July paper.

Also that week, the Moonee Valley Community News called as well as the Leader, to organise a photographer to be sent out , unfortunately I was going away on a ski trip with some friends that week, so the leader wasn't able to get a photographer out in time, but the community news was able to.

The photographer from the community news was really nice and totally took the best pictures I reckon (the guys from the bigger papers were a lot older and kind of hostile).
So I totally hit the front page of the local paper as you can see here:

And there was a photo of both me and Emily on page 12.
Holy crap, I am so pasty white in this picture, you can't even see where my T-shirt ends and my arm starts....

So yeah, all this has been quite beneficial for me, especially since I am finishing uni in a few months and will be looking for a job soon, and any publicity is good publicity.

I reckon the coolest part so far though is hearing from other people who have been inspired to make their own giant videogame accessories and stuff.
That's a pretty fucking cool feeling; inspiring people.

My favourite so far is definitely Matt from http://scadinc.blogspot.com/ who has (apparantly just finished) making a giant SNES pad.
That thing looks fucking awesome, I'm pretty impressed by how he has done the round edges, that's a whole lot of gap filler he must have used there...
The only problem I've got is the colours, he totally should have done the PAL/Jap colours, the US version of the SNES just looked like arse, with it's pansy purple colours.
But either way, that takes nothing away from his awesome craftsmanship.

Oh also; every asking for a wiring diagram for the controller;
There is none! Just locate ground on the pad and wire it to the ground wire in the buttons, then link each of the "active" (or whatever you call them) wires to their corresponding ones.
The Male/Female plug was just so that I could unplug the controller from the original.
Either way, I might post a tutorial in the future explaining how to wire old controllers into USB-computer controllers, so you can play NES/SNES/Megadrive etc. emulators with their original controllers.

Till next time, awesome.

Tuesday, May 13, 2008

Ideas time!

Oh no! The evil Space Invaders have descended upon earth and they're demanding ideas for their....um....idea powered space ship!

Alright, so with the sudden overwhelming positive reception of my NES controller coffee table, I feel the need to outdo it (1UP it, even).
So I thought I'd ask the people of the internet for possible good ideas for future video game related furniture/artwork/creative things that I could try bring to life, and create more step-by-step/how-to style posts.

At the moment I'm thinking of making some sort of space invaders belt buckle using some of those wooden counting block things from primary school;
Perhaps paint them white or green and glue them together (using wire to connect the diagonal ones), and attach a belt clip to the back.

I've also been thinking that I need a better shelving solution for my video game consoles, I've now got 35 consoles at the moment, seriously, look;

bah ha! The Xbox takes up one whole shelf by itself!
And this photo was taken before I got my Famicom, Vectrex and ZX Spectrum.

I'm thinking I want some kind of modular shelving system where the shelves are made of individual boxes that stack on top of each other (like those Tetris shelves by Brave Space Design), and each shelf cavity has it's own power and AV plug, which all run back to a single output plug to the power point/TV.
That way, each console can have it's cords wrapped up next to it and still be plugged in, rather than having to run all the cords out to a power board where they're all tangled and shit.

So yeah, If anyone else has some nice ideas that they'd like to see possibly made, and explained how it was made, post it in the comments to here, and we'll all try to decide which one is the most ultra-awesome idea!

Tuesday, May 6, 2008

NES coffee table FINAL POST!! RAH!!!!

I've finally finished my giant NES controller/ coffee table/ storage box! Awesome!
The piece of glass that I had ordered arrived today, it looks super fresh.
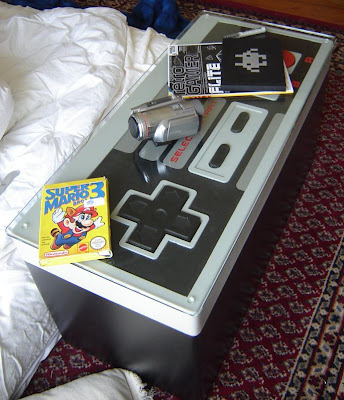
Here are the photos of the final thing, with the glass on top:

You can see I got some tall clear rubber stoppers, which I stuck on the glass, so it doesn't damage the controller when it's sitting on top, and so it clears the height of the buttons:

And again, here are the pictures of what it looks like finished, without the glass.

And also again, here's how it opens up, to reveal the storage space inside, which I have already filled.

Look at the fun-vibes just radiating from Emily's face!:


Some people have asked for the blueprints I used to make it, so they can have a go at making one themselves (yay! I have inspired!).
I didn't really use "blueprints" for this, I basically just stuck my NES controller in a scanner and scanned it. I then printed it off so it filled an A4 page, and used that image to measure how far apart everything on the controller is.
The second half of these blueprints where are just a list of the pieces I needed to cut so I didn't forget.

One thing to remember if you try this, write a list of all possible tools that you might need.
The hardest tool to find for me was a 90mm Hole saw that I needed to cut the A and B buttons.
Take note that I have literally zero woodwork experience (my school never even had woodwork classes), besides the asteroids cabinet I made. However I did get a lot of advice from my dad and uncle about how I should do stuff (ie. like chiselling out the surface so the hinges sit flush etc.)


If you've just arrived at this post, here are all the previous posts I have posted with all the progress shots as I was making it:

NES coffee table
NES coffee table update 1: Bevelling the edges.
NES coffee table update 2: Making the buttons.
NES coffee table update 3: Making the D-pad.
NES coffee table update 4: Mounting the buttons.
NES coffee table update 5: Painting.
NES coffee table update 6: Wiring and final construction.

Here it is in action! zomg!:

Friday, May 2, 2008

NES coffee table update 6: wiring and final construction

While I was giving the coffee table its final paint job, I managed to get my hands on a spare NES controller PCB from a friend (The rubber contacts for the controller it was from were knackered, so I didn't ruin a perfectly good NES controller)

So I got some more coloured wires from Dick Smith and soldered them on to the NES PCB.
This is pretty easy because all of the button contacts ran back to a solder point on the board.

I soldered the other end of the wires to a female 9-pin plug I also got from Dick Smith, so that I could plug it in and unplug it from the wiring on the coffee table.

Meanwhile, I had to put the hinges on the lid and bottom part of the table so it could open and close.
I Had to chisel out the area where the hinges sat, so that they didn't protrude from the surface, creating a gap between the lid and the base.
I also needed to glue screw another piece of wood to the edge that the hinges would sit on, to thicken it up (the 18mm MDF wasn't thick enough to screw the hinges into).

Here is what the hinges looked like once they were screwed in. The pin also comes out, so I can take the lid off whenever I want, like if I needed to repair it or something.

Here is all the wiring for the buttons from the back. The wires there lead into the male side of the 9-pin plug.
Here is how I made the button contacts. The big piece of the underside of the button is a piece of copper, which is connected to the ground wire.
I used a piece of brass for the other side of the contact because it is more springy than copper, thus it won't just bend flat if the button is pressed all the way down.

And here are the final pictures of how the coffee table looks, all finished and awesome-like!
Well it's not quite finished yet; my sister stole the piece of glass that I had designed this for (which sits on top, so you can use it as a table), so I had to order a new one from mitre10 (130 fookin' bucks! That's more than this whole thing cost to make!).


May awesomely daggy 60s styled futon.

Here you can see I have already filled it with crap. It's good though, my room is now a whole lot cleaner.
p.s. that's not my n-gage, is swear...... it's my spare one...

And here's a picture of my girlfriend having enormous amounts of retarded-looking fun playing Super Mario bros. 3;


Okay, I got one more post for the coffee table, even though it's finished.
I'll post a picture of what it looks like with the piece of glass on, and I'll post a video of us having
mega-awesome fun playing it together (and me kind of cracking the shits at Emily for not jumping at the right time.)
And I think I'll also post links to all of the NES coffee table posts, so it's easier to view the progress.

Thursday, April 24, 2008

NES coffee table update 5: Painting

Hey people, for anyone that's actually following this, sorry it's been so long since my last post, uni has been pretty busy and I've just been finding time here and there to put more and more coats of paint on over the past few weeks.

With the construction of the box and lid itself pretty much complete, it was time to give it a bit of colour (although I personally thought it looked kind of cool in the straight brown colour).

To start, I have everything a few good coats of all-purpose spray primer that dad had a few random cans of lying around the garage:

While doing this, I realised that the parts of the MDF where I had cut it and sanded it etc. where soaking up the paint like a sponge, no matter how many coats I put on. To fix this I just rubbed a heap of gap filler over these bits, which made the surface nice and smooth again, and the primer sat on there very nicely.

To paint the buttons, I wanted a less glossy colour for the D-pad (it looked kinf of "messy" when I tries to paint it gloss black), and a gloss red colour for the A and B buttons, so I went down to the local art store and bought two cans of revel model paint.
They were pretty expensive (like 8 bucks each), but they covered the area easily, and they are oil based so they wont rub off or get super dirty with constant use.
I also bought a nice new brush, because I was sick of using crappy old knackered brushes I found around the garage, and my god it made painting the buttons SO much easier...

After painting the buttons, I gave the black part of the controller a coat of black acrylic paint that I had left from the asteroids cabinet I made.
To do the Nintendo logo, A and B buttons, I laid down three strips of masking tape across where the writing would go, I then printed out the logo at the right scale, I then lined it up and glued the piece of paper I had printed the logo on, onto the strips of masking tape.
After sticking it on, I then cut out each letter using a scalpel and peeled back the tape, to reveal the black surface underneath.
Effectively creating a perfect mask, that hugs the surface, to prevent paint bleeding.

I then painted the red over this. It took about 7 coats or so, since it's a light colour on a dark colour.

Half way through cutting the the tape, I accidentally cut myself real bad with the scalpel.
There wasn't too much blood though:

Here's how the Nintendo logo, A and B buttons came out, I wasn't really happy with how the Nintendo logo came out, the edges of the paint had peeled up slightly because my dad was a retard and said "you don't have to peel it back carefully, just rip the mask off real quick".
I don't know whether I should go back and sand it down and redo the logo, I might if it bugs me too much.

Next up was the 4 stripes that run down the controller;
I went to my local Bunnings with an NES controller and got the guy to colour match those bits of the controller. We decide that the Taubmans "Copra" colour was the closest match, so he mixed it up for me.
Seriously though, where else, besides while making a giant NES controller, would someone even use this colour!? It's like a vomit-brown, hideous colour!

At this point I was worried because the colour on the stripes looked really off when I looked at it here, but once the whole controller was painted, it matches in perfectly.

Once the stripes were down, I could then paint the start and select buttons, I used the same method as the Nintendo logo. It only took about 3 coats of paint for this these bits, because they are on a lighter background.

All these colours so far (besides the buttons), I painted with acrylic paint, because of the shorter drying time and because it doesn't take 3 fucking hours to dry the brush/roller out between coats like with oil based paints. Also because I already had the black and the red left over from the Asteroids cabinet.

Once this overlay section was fully painted, I could then mask it off carefully, and begin painting the plasticy grey parts of the controller.

For this I bought some White Knight "touch up paint", which is meant for metal roofs and stuff, but I suppose that just means its more durable.
The guy at Bunnings also helped me pick which colour of this was closest to the NES controller (not that it needed to be that close, most NES controllers are so sun damaged, its hard to tell what the original colour is meant to be).

After a few coats of paint, I peeled back the mask and viola! This is where I started to get really excited, the colours are perfect and everything came off perfectly (which you kind of expect it not to, when you're just figuring out what you're doing along the way)!

Here's what it looks like with the buttons in. In this picture I hadn't painted the base yet (I did that with some black enamel paint I had left of from the asteroids cab)


After this I put in all the button contacts and wired them onto the NES controller PCB and played Super Mario bros. 3 with my girlfriend for like 3 hours, I'm also currently putting the hinges on, and after that, it's done!
My parent's gave the piece of glass that I had made this coffee table to fit, to my sister (basically I will stick rubber stoppers to the piece of glass, to sit on the coffee table when it is not being played), so I will have to go get another piece of glass cut to suit it.

Next post will probably be the second last, or last post for this project! Stay tuned to see the awesome retro flavoured results!
Thursday, April 3, 2008

NES coffee table update 4: mounting the buttons

Having finished making the start and select buttons;

It was time to actually mount the buttons into the lid of the unit itself.

I cut some small strips of the 4mm MDF I had left over to use as packing so I could mount the backing plate for the buttons under the lid and the buttons would protrude the right height above the surface.

Here is the backing plate for the D-pad mounted into the lid, I used two screws per corner just to be sure that it wouldn't rip out if someone whacked the button too hard.

This is what the D-pad backing plate looks like from the top without the D-pad itself inserted in there.

Here is what the underside of the lid looks like after i mounted all of the buttons in there.
I'm thinking perhaps I might need put some protectors over those screws so that I don't accidentally store something in the box that is in the way of the screws, thus damaging it.

And viola! Here are all of the buttons mounted, from the top. I'm thinking I might lower the start and select buttons a bit, they look like the protrude just a bit too much for my liking.


Now the next thing for me to do is to either wire up the buttons, or start painting it.
I'm thinking the bottom half of the box will be high gloss black (I'll use some spray paint for that) and the gray parts of lid will be semi-gloss gray.
The sticker bit of the controller (with the writing and stuff on it) I will probably paint with the left over paint I have from my asteroids arcade cabinet, I will use a roller to paint that because it give it the nice grain to it, just like on an actual NES controller.
I'm not sure how to do the writing, if i can't find some decals that match the Nintendo font, I will have to perhaps put some contact over the area with the writing, then cut out and peel back the parts of the contact in the shape of the letters (thus creating a stencil), and paint it that way.

Next post might not be for a while because I'm pretty busy at the moment, but stay tuned and spread the word suckas!